{{ msg }}
``` 思考一下: 1. 界面显示的内容是什么? 2. 点击按钮后,修改的是哪部分的数据?是 `data` 中定义的,还是 `setup` 中的呢? 先别急着找答案,相信你阅读完这一节,一定会得到答案。 上一节,我们知道了根组件在初始化渲染的过程中,会执行 `mountComponent` 的函数: ```js function mountComponent(initialVNode, container, parentComponent) { // 1. 先创建一个 component instance const instance = (initialVNode.component = createComponentInstance( initialVNode, parentComponent )); // 2. 初始化组件实例 setupComponent(instance); // 3. 设置并运行带副作用的渲染函数 setupRenderEffect(instance, initialVNode, container); } ``` 上文,我们简单介绍了关于 `setupComponent` 函数的作用是为了对实例化后的组件中的属性做一些优化、处理、赋值等操作。本小节我们将重点介绍 `setupComponent` 的内部实现和作用。 ### 初始化组件实例 我们再来回顾一下 `setupComponent` 在源码中的实现: ```js export function setupComponent(instance, isSSR = false) { const { props, children } = instance.vnode // 判断组件是否是有状态的组件 const isStateful = isStatefulComponent(instance) // 初始化 props initProps(instance, props, isStateful, isSSR) // 初始化 slots initSlots(instance, children) // 如果是有状态组件,那么去设置有状态组件实例 const setupResult = isStateful ? setupStatefulComponent(instance, isSSR) : undefined return setupResult } ``` `setupComponent` 方法做了什么? 1. 通过 `isStatefulComponent(instance)` 判断是否是有状态的组件; 2. `initProps` 初始化 `props`; 3. `initSlots` 初始化 `slots`; 4. 根据组件是否是有状态的,来决定是否需要执行 `setupStatefulComponent` 函数。 其中, `isStatefulComponent` 判断是否是有状态的组件的函数如下: ```js function isStatefulComponent(instance) { return instance.vnode.shapeFlag & ShapeFlags.STATEFUL_COMPONENT } ``` 前面我们已经说过了,`ShapeFlags` 在遇到组件类型的 `type = Object` 时,`vnode` 的`shapeFlags = ShapeFlags.STATEFUL_COMPONENT`。所以这里会执行 `setupStatefulComponent` 函数。 ```js function setupStatefulComponent(instance, isSSR) { // 定义 Component 变量 const Component = instance.type // 1. 创建渲染代理的属性访问缓存 instance.accessCache = Object.create(null) // 2. 创建渲染上下文代理, proxy 对象其实是代理了 instance.ctx 对象 instance.proxy = new Proxy(instance.ctx, PublicInstanceProxyHandlers); // 3. 执行 setup 函数 const { setup } = Component if (setup) { // 如果 setup 函数带参数,则创建一个 setupContext const setupContext = (instance.setupContext = setup.length > 1 ? createSetupContext(instance) : null) // 执行 setup 函数,获取结果 const setupResult = callWithErrorHandling(setup, instance, 0, [instance.props, setupContext]) // 处理 setup 执行结果 handleSetupResult(instance, setupResult) } else { // 4. 完成组件实例设置 finishComponentSetup(instance, isSSR) } } ``` `setupStatefulComponent` 字面意思就是设置有状态组件,那么什么是有状态组件呢?简单而言,就是对于有状态组件,`Vue` 内部会保留组件状态数据。相对于有状态组件而言,`Vue` 还存在一种函数组件 `FUNCTIONAL_COMPONENT`,一起看个示例: ```js import { ref } from 'vue'; export default () => { let num = ref(0); const plusNum = () => { num.value ++; }; return ({{ num }}
``` `Vue 2.x` 是如何实现访问 `this.num` 获取到 `num` 的值,而不是通过 `this._data.num` 来获取 `num` 的值呢?其实 `Vue 2.x` 版本中,为 `_data` 设置了一层代理: ```js _proxy(options.data); function _proxy (data) { const that = this; Object.keys(data).forEach(key => { Object.defineProperty(that, key, { configurable: true, enumerable: true, get: function proxyGetter () { return that._data[key]; }, set: function proxySetter (val) { that._data[key] = val; } }) }); } ``` 本质就是通过 `Object.defineProperty` 使在访问 `this` 上的某属性时从 `this._data` 中读取(写入)。 而 `Vue 3` 也在这里做了类似的事情,`Vue 3` 内部有很多状态属性,存储在不同的对象上,比如 `setupState`、`ctx`、`data`、`props`。这样用户取数据就会考虑具体从哪个对象中获取,这无疑增加了用户的使用负担,所以对 `instance.ctx` 进行代理,然后根据属性优先级关系依次完成从特定对象上获取值。 #### get 了解了代理的功能后,我们来具体看一下是如何实现代理功能的,也就是 `proxy` 的 `PublicInstanceProxyHandlers` 它的实现。先看一下 `get` 函数: ```js export const PublicInstanceProxyHandlers = { get({ _: instance }, key) { const { ctx, setupState, data, props, accessCache, type, appContext } = instance let normalizedProps if (key[0] !== '$') { // 从缓存中获取当前 key 存在于哪个属性中 const n = accessCache![key] if (n !== undefined) { switch (n) { case AccessTypes.SETUP: return setupState[key] case AccessTypes.DATA: return data[key] case AccessTypes.CONTEXT: return ctx[key] case AccessTypes.PROPS: return props![key] } } else if (setupState !== EMPTY_OBJ && hasOwn(setupState, key)) { // 从 setupState 中取 accessCache![key] = AccessTypes.SETUP return setupState[key] } else if (data !== EMPTY_OBJ && hasOwn(data, key)) { // 从 data 中取 accessCache![key] = AccessTypes.DATA return data[key] } else if ( (normalizedProps = instance.propsOptions[0]) && hasOwn(normalizedProps, key) ) { // 从 props 中取 accessCache![key] = AccessTypes.PROPS return props![key] } else if (ctx !== EMPTY_OBJ && hasOwn(ctx, key)) { // 从 ctx 中取 accessCache![key] = AccessTypes.CONTEXT return ctx[key] } else if (!__FEATURE_OPTIONS_API__ || shouldCacheAccess) { // 都取不到 accessCache![key] = AccessTypes.OTHER } } const publicGetter = publicPropertiesMap[key] let cssModule, globalProperties if (publicGetter) { // 以 $ 保留字开头的相关函数和方法 // ... } else if ( // css module (cssModule = type.__cssModules) && (cssModule = cssModule[key]) ) { // ... } else if (ctx !== EMPTY_OBJ && hasOwn(ctx, key)) { // ... } else if ( // 全局属性 ((globalProperties = appContext.config.globalProperties), hasOwn(globalProperties, key)) ) { // ... } else if (__DEV__) { // 一些告警 // ... } } } ``` 这里,可以回答我们的第一步 `创建渲染代理的属性访问缓存` 这个步骤的问题了。如果我们知道 `key` 存在于哪个对象上,那么就可以直接通过对象取值的操作获取属性上的值了。如果我们不知道用户访问的 `key` 存在于哪个属性上,那只能通过 `hasOwn` 的方法先判断存在于哪个属性上,再通过对象取值的操作获取属性值,这无疑是多操作了一步,而且这个判断是比较耗费性能的。如果遇到大量渲染取值的操作,那么这块就是个性能瓶颈,所以这里用了 `accessCache` 来标记缓存 `key` 存在于哪个属性上。这其实也**相当于用一部分空间换时间的优化**。 接下来,函数首先判断 `key[0] !== '$'` 的情况(`$` 开头的一般是 `Vue` 组件实例上的内置属性),在 `Vue 3` 源码中,会依次从 `setupState、data、props、ctx` 这几类数据中取状态值。 这里的定义顺序,决定了后续取值的优先级顺序:`setupState` >`data` >`props` > `ctx`。 如果 `key` 是以 `$` 开头,则首先会判断是否是存在于组件实例上的内置属性: 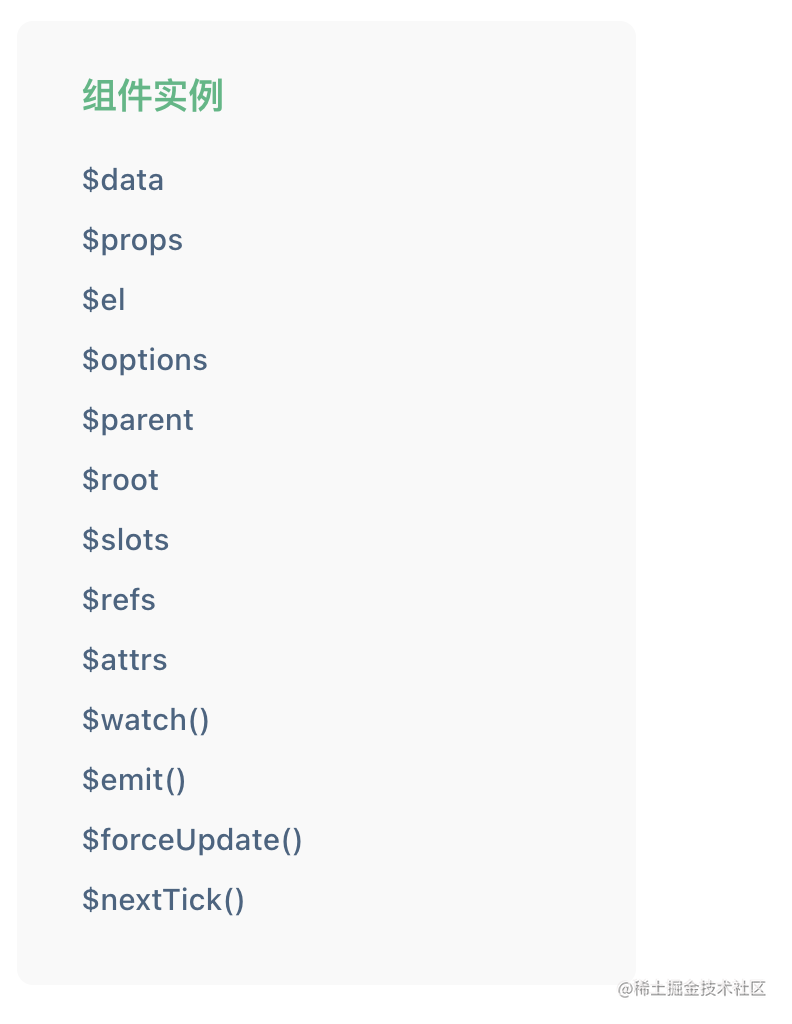 整体的获取顺序依次是:`publicGetter` > `cssModule` > `ctx`。最后,如果都取不到,那么在开发环境就会给一些告警提示。 #### set 接着继续看一下设置对象属性的代理函数: ```js export const PublicInstanceProxyHandlers = { set({ _: instance }, key, value) { const { data, setupState, ctx } = instance if (setupState !== EMPTY_OBJ && hasOwn(setupState, key)) { // 设置 setupState setupState[key] = value return true } else if (data !== EMPTY_OBJ && hasOwn(data, key)) { // 设置 data data[key] = value return true } else if (hasOwn(instance.props, key)) { // 不能给 props 赋值 return false } if (key[0] === '$' && key.slice(1) in instance) { // 不能给组件实例上的内置属性赋值 return false } else { // 用户自定义数据赋值 ctx[key] = value } return true } } ``` 可以看到这里也是和前面 `get` 函数类似的通过调用顺序来实现对 `set` 函数不同属性设置优先级的,可以直观地看到优先级关系为:`setupState` > `data` > `props`。同时这里也有说明:就是如果直接对 `props` 或者组件实例上的内置属性赋值,则会告警。 #### has 最后,再看一个 `proxy` 属性 `has` 的实现: ```js export const PublicInstanceProxyHandlers = { has({_: { data, setupState, accessCache, ctx, appContext, propsOptions }}, key) { let normalizedProps return ( !!accessCache![key] || (data !== EMPTY_OBJ && hasOwn(data, key)) || (setupState !== EMPTY_OBJ && hasOwn(setupState, key)) || ((normalizedProps = propsOptions[0]) && hasOwn(normalizedProps, key)) || hasOwn(ctx, key) || hasOwn(publicPropertiesMap, key) || hasOwn(appContext.config.globalProperties, key) ) }, } ``` 这个函数则是依次判断 `key` 是否存在于 `accessCache` > `data` > `setupState` > `prop` > `ctx` > `publicPropertiesMap` > `globalProperties`,然后返回结果。 `has` 在业务代码的使用定义如下: ```js export default { created () { // 这里会触发 has 函数 console.log('msg' in this) } } ``` 至此,我们就搞清楚了创建上下文代理的过程。 ### 调用执行 setup 函数 一个简单的包含 `CompositionAPI` 的 `Vue 3 demo` 如下: ```html{{ msg }}
``` 这里的 `setup` 函数,正是在这里被调用执行的: ```js // 获取 setup 函数 const { setup } = Component // 存在 setup 函数 if (setup) { // 根据 setup 函数的入参长度,判断是否需要创建 setupContext 对象 const setupContext = (instance.setupContext = setup.length > 1 ? createSetupContext(instance) : null) // 调用 setup const setupResult = callWithErrorHandling(setup, instance, 0, [instance.props, setupContext]) // 处理 setup 执行结果 handleSetupResult(instance, setupResult) } ``` #### createSetupContext 因为 `setupContext` 是 `setup` 中的第二个参数,所以会判断 `setup` 函数参数的长度,如果大于 `1`,则会通过 `createSetupContext` 函数创建 `setupContext` 上下文。 该上下文创建如下: ```js function createSetupContext (instance) { return { get attrs() { return attrs || (attrs = createAttrsProxy(instance)) }, slots: instance.slots, emit: instance.emit, expose } } ``` 可以看到,`setupContext` 中包含了 `attrs、slots、emit、expose` 这些属性。这些属性分别代表着:组件的属性、插槽、派发事件的方法 `emit`、以及所有想从当前组件实例导出的内容 `expose`。 这里有个小的知识点,就是可以通过函数的 `length` 属性来判断函数参数的个数: ``` function foo() {}; foo.length // 0 function bar(a) {}; bar.length // 1 ``` #### callWithErrorHandling 第二步,通过 `callWithErrorHandling` 函数来间接执行 `setup` 函数,其实就是执行了以下代码: ```js const setupResult = setup && setup(shallowReadonly(instance.props), setupContext); ``` 只不过增加了对执行过程中 `handleError` 的捕获。 在后续章节的阅读中,你会发现 `Vue 3` 很多函数的调用都是通过 `callWithErrorHandling` 来包裹的: ```js export function callWithErrorHandling(fn, instance, type, args = []) { let res try { res = args ? fn(...args) : fn() } catch (err) { handleError(err, instance, type) } return res } ``` 这样的好处一方面可以由 `Vue` 内部统一 `try...catch` 处理用户代码运行可能出现的错误。另一方面这些错误也可以交由用户统一注册的 `errorHandler` 进行处理,比如上报给监控系统。 #### handleSetupResult 最后执行 `handleSetupResult` 函数: ```js function handleSetupResult(instance, setupResult) { if (isFunction(setupResult)) { // setup 返回渲染函数 instance.render = setupResult } else if (isObject(setupResult)) { // proxyRefs 的作用就是把 setupResult 对象做一层代理 instance.setupState = proxyRefs(setupResult); } finishComponentSetup(instance) } ``` `setup` 返回值不一样的话,会有不同的处理,如果 `setupResult` 是个函数,那么会把该函数绑定到 `render` 上。比如: ```js ``` 当 `setupResult` 是一个对象的时候,我们为 `setupResult` 对象通过 `proxyRefs` 作了一层代理,方便用户直接访问 `ref` 类型的值。比如,在模板中访问 `setupResult` 中的数据,就可以省略 `.value` 的取值,而由代理来默认取 `.value` 的值。 > 注意,这里 `instance.setupState = proxyRefs(setupResult);` 之前的 Vue 源码的写法是 `instance.setupState = reactive(setupResult);` ,至于为什么改成上面的,Vue 作者也有相关说明:[Template auto ref unwrapping for `setup()` return object is now applied only to the root level refs.](https://github.com/vuejs/core/pull/1682) ### 完成组件实例设置 最后,到了 `finishComponentSetup` 这个函数了: ```js function finishComponentSetup(instance) { // type 是个组件对象 const Component = instance.type; if (!instance.render) { // 如果组件没有 render 函数,那么就需要把 template 编译成 render 函数 if (compile && !Component.render) { if (Component.template) { // 这里就是 runtime 模块和 compile 模块结合点 // 运行时编译 Component.render = compile(Component.template, { isCustomElement: instance.appContext.config.isCustomElement || NO }) } } instance.render = Component.render; } if (__FEATURE_OPTIONS_API__ && !(__COMPAT__ && skipOptions)) { // 兼容选项式组件的调用逻辑 } } ``` 这里主要做的就是根据 `instance` 上有没有 `render` 函数来判断是否需要进行运行时渲染,运行时渲染指的是在浏览器运行的过程中,动态编译 `` 标签内的内容,产出渲染函数。对于编译时渲染,则是有渲染函数的,因为模板中的内容会被 `webpack` 中 `vue-loader` 这样的插件进行编译。 另外需要注意的,这里有个 `__FEATURE_OPTIONS_API__` 变量用来标记是否是兼容 `选项式 API` 调用,如果我们只使用 `Composition Api` 那么就可以通过 `webpack` 静态变量注入的方式关闭此特性。然后交由 `Tree-Shacking` 删除无用的代码,从而减少引用代码包的体积。 ## 总结 有了上面的一些介绍,我们再来回答一下开篇中提到的问题: 1. 初始化渲染的时候,会从实例上获取状态 `msg` 的值,获取的优先级是:`setupState` >`data` >`props` > `ctx`。`setupState` 就是 `setup` 函数执行后返回的状态值,所以这里渲染的是:`msg from setup`。 2. 点击按钮的时候,会更新实例上的状态,更新的优先级是:`setupState` > `data`。所以会更新 `setup` 中的状态数据 `msg`。